Living Room #2 Fireplace and Cabinets

The original cabinets on the sides of the fireplace were 9″ deep. Since I have bookcases surrounding the windows in the sun room I thought I would use these cases to display some art pottery or glass.

1 cutting cabinet sides Because I had the space, I made the cases 16″ deep. Here I’m set up to cut the case sides to length after I ripped them on the table saw to the proper width. I’m using 3/4″ birch plywood that has a UV finish coat on both sides.

2 frame and cabinetThe face frame layout with the cabinet box in the background. The face frames are a little more than 3/4″ longer because a trim piece fits under the doors and is a stool for the decorative pilasters – you’ll see.

3 first fittingThe boxes and face frames are test fit into the space. The cabinets have a space between the walls to allow for a chase for electrical on this side and gas pipes on the opposite side. The face frame is not attached to allow the proper placement of the boxes which are then marked for reference.

4 hinge jigOriginally the doors had surface mount butterfly hinges. I wanted to use an original style hinge but didn’t have enough room because the fireplace will now have a surround that takes up the space needed for this type of hinge. So I opted for a euro style hinge that is inset and concealed. Here is a jig set up to bore the 35mm hole for the hinge cup and the sample test to the right in the picture.

6 hinge profileThis view shows the hinges installed to the doors and the face frame brackets attached. These are ‘clip top’ hinges – meaning you can easily remove the doors from the cabinet by depressing a clip. They are also adjustable 3 ways which is great for original 80 year old doors.

7 hinges onThe hinges are installed and fit to the space to make sure there’s no clearance problems. The face frames are not attached to the boxes yet.

8 face frame fillerThe face frame is exposed on the inside of the cabinet and that little pocket screw hole tucked up at the top of the cabinet would be visible – if you laid down on your back inside the cabinet and looked up. But being anal retentive it had to be filled. Here is a tapered dowel glued in the screw hole.

9 face frame sandedA little sanding and it disappears – I feel so much better now. The top one is outside the cabinet box.

10 inside face frameThe inside frame is finished and the hinge plates are screwed to the frames.

11 box to frameFinally the face frames are attached to the cabinet boxes with Kreg screws on the sides and top. The bottom gets part of the base that is glued and screwed as well. The back was finished with a 1/2″ plywood backer that was finish painted before installing.

12 cabinet componentsHere is the finished cabinet ready to instal. I cut the front of the floor base down so I could attach the cut off piece on the bottom of the cabinet box for support. Sometimes you have to improvise – especially when you make things without any plans.

Hang in there – the doors will be hanging shortly….I hope.


Living Room #1 Floors and Fireplace

We left off with hopping from the 2nd floor master bath to the 1st floor living room. After moving a room full of clutter and exterior insulation panels, we’re ready to tackle some new projects.

1a Old roomSo here’s the basic layout. Originally a painted brick fireplace with original cabinets on the side. Looks good, but lots of problems with windows, sloped floors and a drafty open fireplace.

1 floor shim startSo we cleaned it up, ran vents for a direct vent fireplace. Cement board was attached to the brick with modified thinset and tapcons. The walls were drywalled and new windows added on either side of the fireplace.These are insulated units that don’t open, as stained glass windows go here to block the scenic view of the brick wall.

2 floor shimThis area of the floor had a 3/4″ slope for some reason. The floor in general is flat and pretty level. The house being 80 years old this year, I guess a little droopiness is to be expected. So to fix this I added shims before the new 1/2 CDX plywood underlayment was screwed down.

3 sheathing  The first sheet goes in and checked to make sure its level. The plywood is screwed through the original 3/4″ pine floor into the floor joists.

4 levelAnd it is flat and level.

5 floor viewThe flooring is added and shimmed slightly to keep the floor flat. It’s pretty level, but little dips and uneven areas could be shimmed when the finish floor goes in. I’ve made 2X6 bases for the new cabinets and set the doors on top to visualize what to do next.

6 cabinet pieceI kept a piece of the old cabinet frame to use as a guide for the new face frames. These cabinet doors are about the only old thing left in this place, so I want to duplicate the design.

7 face frame layoutEverything you need in life is right here. No time to eat, I have my Diet Coke and some crackers for lunch while I figure out these cabinet face frames.

8 face frame figuresI ran out of yellow pads, so plywood scrap will do. Each side of the fireplace is different, and each set of doors is slightly different as well – so it looks like I’ll need both sides of this plywood to do some cypher’n.

9 door mock upThe doors are not square – they actually flair out at the bottoms slightly. If you were hanging around on the same hinges for 80 years you might have a wider bottom too. We’ll square up the door later – right now we need to make sure the door frames are just a slight bit small to allow us to shave the doors down just a smidgen.

10 kreg jigEven though I have some pretty nice tools – I still use this bottom of the line Kreg screw kit. It still works great, even though you can get some fancy newer models.

11 face frame glue upOnce I glue and screw the frames, I usually clamp them down on a flat surface. Sometimes the screws make the frame joints ‘rock’ slightly and cup the frame at the joint. This seems to help.

12 face frame fittingThe face frames in for a trial fit. The rails closest to the fireplace is wider than the ones next to the walls. This is to compensate for the thickness of the fireplace mantle sides. (Which I have yet to design).

Stick around – we’ll have a nice fire going – around August I suspect.


Master Bath Reno #10 time to move to another floor

So we’re stuck with a miss-cut door.Three out of four’s not bad – really?  So after a night of thinking about the problem I came up with a fairly simple fix.

1 door markI’ll need to cut this much off the top of the door – close to 1/2″. I’ll take the hinge plates mounted to the cabinet and move them up the same amount that I cut off the door.

2 glued on bottomThen we’ll take the cut piece from the top and glue and nail to the bottom. Then use a solvent based wood filler for the first coat.

3 vanity drywallWhile that’s setting up, we’ll add some drywall in the vanity space between the cabinets.

4 door sandedThen back to sand the the door joint.

5 door primedSome surface filler is applied and then the first primer coat goes on. Now I’m glad my wife wanted painted doors. It will get several more applications until the seam disappears.

6 vanity drywall cut outAnd while that’s getting finished we’ll add the electrical boxes for the sconces and cut the hole for the vanity cabinet. I’m getting to a stand still here – better go downstairs and start on another project.

7 fireplace cabinetsAnd this looks like a good candidate – the cabinets next to the fireplace.

Time to clear out another room and get to work… stick around we’ll finish something sooner or later.


Master Bath Reno #9 the Door edition

Now for a change of floors, we pop up to the 2nd floor and back in the master bath. We left off with trying to repurpose a set of solid wood panel doors that I cut down the middle.

1 cutting doorWe start by cutting the length of the doors down size. Simple enough – well, maybe not – we’ll see.

2 filling the holesOnce the doors were cut down I used the cut off pieces and made the filler pieces using a 2 1/4″ hole saw without the guide bit on a drill press. These were glued in place.

3 first hanging the doorI arranged the hole section of each door to be next to the walls.

4 door hinge detailTo hang the doors I used a euro style hinge made for thick overlay doors. These hinges will accommodate a door up to 1 1/2″ thick. I used three hinges per door.

5 door hinge close upThe hinges use a 40mm hole to recess the hinge cup into the door. I made a simple jig out of a thin piece of plywood to make sure all the hinges were aligned to the door edge.

6 all doors onAll the doors are up for their preliminary fitting. Don’t worry about the gaps. There was a major mistake staring me right in the face – can you spot it?

7 doors openThe doors have self closing hinges and work well on the 18″ wide doors.

info-1The thing is when you cut a door down the middle you have to do a little reinforcing. The cutting removes one of the stiles – and that’s an important structural element.

8 door rail stripSo we’ll add a strip of wood to cap the cut side. Glued and nailed, it will keep those pesky rails together.

9 door strip onHere you have the mini stile finished and in place.

10 cabinet detailWhile this is going on, we’ll put the side supports in the cabinet – this will reinforce the hinge area. While we’re at it we’ll prime and then paint the interiors with BM Impervo Waterborn enamel. Color is the same as the ceiling.

11 doors on finalHere the doors are painted and finished. I wanted them rustic and antiqued, my wife wants them white – well maybe I’ll get to glaze them later. The nice thing about the euro style hinge is you have three ways to adjust the hinge to give you a nice finished look at the door seam. The big mistake is right there, but I still don’t notice it.

12 door side viewThe doors overlay the cabinet frame. It’s about this time when I realized my mistake. Have you found it yet?

13 door mistakeFor those much more observant than me you probably spotted it at the beginning. This door seems curiously lower than the other door. Why? Because I cut it upside down!


All together now….   crap.


Hang in there – we’ll fix it somehow.


Woman Cave #4 time to move to another project

Happy New Year to everyone. It’s been some time since my last installment at the Misadventures project. But I’ve been busy with the gallery and of course here at the renovation home.

1 bathroom wall framingNow that the tub has found it’s final resting place we can build a wall behind it. 1st a pressure treated plate is attached to the concrete floor with Tapcon screws. The 2X4 studs are then cut and screwed into place. I like to assemble the wall this way instead of putting it together on the floor and then sliding in place as a single unit. Being an old house nothing is uniform and this allows for minor variations in the old framing.

2 closet framingThe wall framing incorporates the brick support pillar so it will be invisible. I placed a small closet in this area as well.

3 closet doorI used an 18″ door for the closet. It’s a small place to store cleaning stuff.

4 whirlpool tub framingThe other side of this area will be used as an open shelf unit to hold spa towels.

5 basement wall framingI went as far as I could with the wall framing, incorporating the breaker panel into the wall. Spray foam will be added to insulate the walls.

This is a short post, as the weather has stopped this project until the ground thaws out. That cast iron drain line will go away and I’ll  add an egress window in the spring – then I can finish the wall framing and get to the pretty stuff!

Don’t worry, I’ve got lots of other projects to keep me busy until then.

Next up – back to the Master Bath….

The Woman Cave #3

We continue with this epic renovation. I have slowed down the past couple of weeks because I do have a real job and this is the time of the year our gallery gets pretty busy.

1 tub baseThe cutout tub base top is starting to get built – upside down.

2 floor cutAnd while we’re at it – we’ll start cutting the floor up. I had pipe laid under the floors before the overlay of 4″ of concrete. Since I made the bathroom much bigger I now have to cut the paths for the new lines.* Note to self* Lay out the bathroom before you pump your basement full of concrete.

3 tub base doneThe path is finished! No problem!

4 floor cut additionBut we made the bathroom even bigger to accommodate the steam shower. So more cutting.

5 floor cut doneThat’s it – no more concrete cutting.

6 pantry startWe’ll get over to the pantry now and start building the walls. I use kiln dry pressure treated lumber for the bottom plates. I’ll build a new staircase once we’re finished with the walls. I also installed a new jet pump under the stairs so I can have well water for our garden.

7 bath wall framingNow over to work on the bathroom walls – I love variety.

8 floor beam cutI’m using full height doors down here, so I made temporary walls and cut the floor support away.

9 door framingThen re-framed with a smaller header for the new door. This area is not load bearing – so the header is more than adequate.

10 bath doorI used the same diffused glass for the door as in all the other bathrooms, but I made it a single large piece.

11 pantry doorAnd looking through the bathroom door, I used the same kind of door for the pantry. I think it gives the space more of a vintage steam room kinda look – but what do I know.

12 entrance layoutThe walls for the doors are in. You can see the layout has the pantry with two angled walls. This is the only way I could get the two entrances into the space. I wanted to avoid a straight wall with 2 doors. The bath door is on the left and pantry to the right. On the other side of the wall space between the doors there will be a refrigerator nook in the pantry.

Well, we’ll just keep keepin on….


Woman Cave Floor Plan

Some one asked about a floor plan – well I didn’t have one so I drew this one in an old version of Microsoft Publisher. Who needs SketchUp?

woman-cave-planI get a little room downstairs with the furnace and hot water heaters – she gets the rest.

But I’ve got the 4 car garage 🙂 Well, so far I have a 4 car garage…

The Woman Cave #2

So we realize that this basement project is going to get complicated – and probably expensive – so I can be comforted knowing that this project will be just like everything else here at MisAdventures.

1 electrical before

The first thing is to relocate the main bathroom plumbing – yep we moved this over from the center of the ceiling to the wall. Of course this is the plumbing for the only finished bathroom- so we do it again – but that’s the way we roll.

2 electrical viewObviously, the person who ran all this wire to the second floor didn’t think anyone would possibly want to finish the basement – so let’s just tack up some 1X4 and staple the wires to the floor joists.

3 electrical junction boxAnd since the breaker box looked like too much trouble to run the wires directly in there – let’s put a big old junction box and make connections there. These guys were definitely on crack. Now I checked with two electricians and both declined to work on this rat’s nest.

4 electric in progressSo like everything else, I did it myself. I took out all the remaining armor cable that was left in the house and ran all new cable. I pulled all the existing wire from the breaker box and ran new. I made a deal with my regular electrician that I would rewire the house and he would come and inspect my work and call in the inspection. Worked out great.

5 rewire boxThe box is a 200amp, so there is enough room to barely fit it all in – but we’ll wire from scratch to make sure.

6 support pole wallI placed a support column in the proper point load location – not the best place, but that’s where it had to be. It has a 2′ deep footer below to make sure the beam above is super stable – the 1st floor shower is right above this column. I made the wall angled to catch this column so I can enclose it in the wall. This will allow the new staircase to widen at the bottom making entering the basement more open.

7 bath areaSome people use CAD or SketchUp to design their spaces – but I prefer the traditional MisAdventures way – a couple of pieces of lumber. It gives a fantastic 3-D rendering that a flat screen just can’t duplicate.

8 bath wallAnd then you can simply add your design elements with a trash can, some lumber cut-offs and the bathroom just comes alive. Um, that’s the steam shower over there in the corner.

9 tub templateI took the whirlpool tub that was on the second floor and will use it down here. I’ve made a cardboard template from 4 strips of cardboard hot glued together.

10 tub surroundI’ll just trace it on 5/8″ plywood and and cut it out.

And we continue…

The Woman Cave – The Basement #1

OK, you that have been with me from the beginning know one thing – this renovation has gone on way too long. We’re 5+ years and counting – and you know my wife has asked me a couple of times over the years, um…just when might we move into this place you play at everyday? So like any manly man – I puffed up my chest and walked right up to her and answered the question directly. No mealy-mouthed beat around the bush kinda guy here. I did what any sensible husband would do in the same situation – I asked her how big she wanted the steam shower in her new woman cave.

Since the weather has turned to winter, no more outdoor work for the time being. So I have turned my attention to the basement – which I have relinquished ownership to my wife.

So let’s get Started

1 basement plumbingLet’s take a little tour, shall we? All the plumbing and that hack job of electrical will have to go to get a smooth ceiling.

2 basement beforeAnd look at this place! A cave maybe, but Woman Cave never! Well, it’s time to make something out of this chaos.

3 basement stairsNot looking too promising – what a mess! New stairs are in order, and we’ve got a new washer and dryer upstairs in the mudroom, so this all has to go.

4 waterproofingFirst  up is waterproofing which is covered under the basement renovation links.

7 pour completeBut once I had the brand new floor poured I decided that I should have moved that pesky furnace – since I decided to rip out all the duct work and start over.

8 furnace teardownSo another little project in the making…

9 furnace goneAnd in no time we have no heat! Good thing it was summer.

10 floor patchedOf course then we have to patch the hole in the floor.

11 ductwork pileAnd a pile of old duct work the Heating and Air guy is trying to figure out how to git rid of.

Stick around – this could get interesting.


Azek Trim #3 The Difficult Project

So far, so good- we were able to get some of the tall stuff done – like the pointy front of the house. It was pretty easy because it was only one section of scaffolding two units high. And we’ve been able to get the fascia and soffit wrapped around the sunroom without incident.

Now we go for a bigger project – the sides of the house. We’ll do the tricky side first.  The 1st problem is scaffolding.  It takes a little longer for a 60 year old who still walks like a penguin from last year’s experiment with gravity to get things in order.

1 scaffold set upThis is set up #2. I put it up once, but could only get two sections wide – so down it came and this configuration went up. That took about 2 1/2 hours of my life. I’ve got the center and right hand fascia in place, temporarily fastened with cortex screws.

2 eave panelThe 2nd problem is the main roof dives into the sunroom roof. I made a panel of
Azek that rests slightly above the roof surface. The panel is removable when the sunroom needs to be re-roofed. Black roof caulking covers the small gap between the Azek and roof surface to keep any water or insects from getting in.

3 soffit instalI’m using Quality Edge TruVent  hidden vent aluminum soffit. It has no visible holes and looks more like the original type of soffit that was on this home.

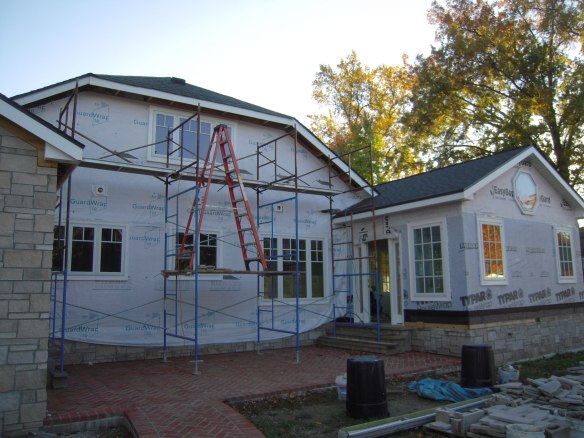
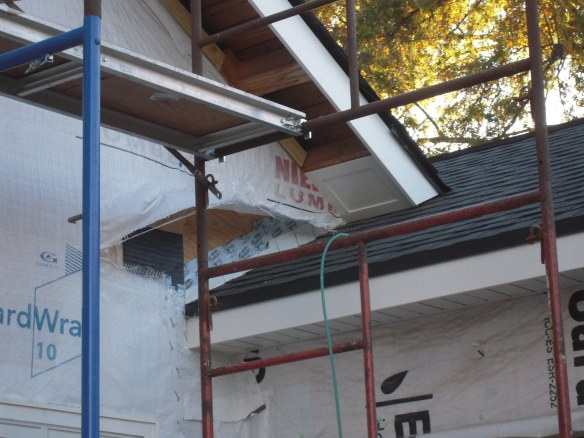
4 eave problemProblem #3 is because there was no plan when I started building this place. The siding and trim detail are going to be a problem here.

5 eave problem closeupHere’s a close-up of the problem. We’ll have frieze trim below the soffit and we’ll have another trim piece right above the mudroom roof surface. If we leave it as is, it will have tiny pieces of siding on the wall here.

6 eave side panelSo my solution is to make an Azek panel to span this roof area under the eave. I made a plywood template to make sure I got all of the angles right. The original roof is a 7/12 and the mudroom roof is a 6/12, so this panel had to taper to fit the odd angles. Also the upright elements had to be plumb when in place to make everything look like it’s supposed to.

7 fascia damageI used the original fascias on most of the house as backer for the new Azek trim – but this piece had to be replaced – as did all of the original fascia on the patio side of the house.

8 panel installI fastened the panel in place with removable cortex screws. The panel then had to be wrapped around the corner with more trim pieces to meet the eave soffits. I’ll detail that in another post.

9 eave side panel other viewLooking from the other way, the side panel ends at the roof ridge. This will allow the siding to terminate here instead of having those tiny pieces under the eave.

10 fascia installationNow to put the other 15′ fascia board up. Working alone has it’s challenges, but the good thing is you can go as slow as you want.

Hang in there fearless renovators – we’ll get through this together – even if I’m doing all the work.