The Woman Cave – The Basement #1

OK, you that have been with me from the beginning know one thing – this renovation has gone on way too long. We’re 5+ years and counting – and you know my wife has asked me a couple of times over the years, um…just when might we move into this place you play at everyday? So like any manly man – I puffed up my chest and walked right up to her and answered the question directly. No mealy-mouthed beat around the bush kinda guy here. I did what any sensible husband would do in the same situation – I asked her how big she wanted the steam shower in her new woman cave.

Since the weather has turned to winter, no more outdoor work for the time being. So I have turned my attention to the basement – which I have relinquished ownership to my wife.

So let’s get Started

1 basement plumbingLet’s take a little tour, shall we? All the plumbing and that hack job of electrical will have to go to get a smooth ceiling.

2 basement beforeAnd look at this place! A cave maybe, but Woman Cave never! Well, it’s time to make something out of this chaos.

3 basement stairsNot looking too promising – what a mess! New stairs are in order, and we’ve got a new washer and dryer upstairs in the mudroom, so this all has to go.

4 waterproofingFirstĀ  up is waterproofing which is covered under the basement renovation links.

7 pour completeBut once I had the brand new floor poured I decided that I should have moved that pesky furnace – since I decided to rip out all the duct work and start over.

8 furnace teardownSo another little project in the making…

9 furnace goneAnd in no time we have no heat! Good thing it was summer.

10 floor patchedOf course then we have to patch the hole in the floor.

11 ductwork pileAnd a pile of old duct work the Heating and Air guy is trying to figure out how to git rid of.

Stick around – this could get interesting.


Azek Trim #3 The Difficult Project

So far, so good- we were able to get some of the tall stuff done – like the pointy front of the house. It was pretty easy because it was only one section of scaffolding two units high. And we’ve been able to get the fascia and soffit wrapped around the sunroom without incident.

Now we go for a bigger project – the sides of the house. We’ll do the tricky side first.Ā  The 1st problem is scaffolding.Ā  It takes a little longer for a 60 year old who still walks like a penguin from last year’s experiment with gravity to get things in order.

1 scaffold set upThis is set up #2. I put it up once, but could only get two sections wide – so down it came and this configuration went up. That took about 2 1/2 hours of my life. I’ve got the center and right hand fascia in place, temporarily fastened with cortex screws.

2 eave panelThe 2nd problem is the main roof dives into the sunroom roof. I made a panel of
Azek that rests slightly above the roof surface. The panel is removable when the sunroom needs to be re-roofed. Black roof caulking covers the small gap between the Azek and roof surface to keep any water or insects from getting in.

3 soffit instalI’m using Quality Edge TruVentĀ  hidden vent aluminum soffit. It has no visible holes and looks more like the original type of soffit that was on this home.

4 eave problemProblem #3 is because there was no plan when I started building this place. The siding and trim detail are going to be a problem here.

5 eave problem closeupHere’s a close-up of the problem. We’ll have frieze trim below the soffit and we’ll have another trim piece right above the mudroom roof surface. If we leave it as is, it will have tiny pieces of siding on the wall here.

6 eave side panelSo my solution is to make an Azek panel to span this roof area under the eave. I made a plywood template to make sure I got all of the angles right. The original roof is a 7/12 and the mudroom roof is a 6/12, so this panel had to taper to fit the odd angles. Also the upright elements had to be plumb when in place to make everything look like it’s supposed to.

7 fascia damageI used the original fascias on most of the house as backer for the new Azek trim – but this piece had to be replaced – as did all of the original fascia on the patio side of the house.

8 panel installI fastened the panel in place with removable cortex screws. The panel then had to be wrapped around the corner with more trim pieces to meet the eave soffits. I’ll detail that in another post.

9 eave side panel other viewLooking from the other way, the side panel ends at the roof ridge. This will allow the siding to terminate here instead of having those tiny pieces under the eave.

10 fascia installationNow to put the other 15′ fascia board up. Working alone has it’s challenges, but the good thing is you can go as slow as you want.

Hang in there fearless renovators – we’ll get through this together – even if I’m doing all the work.

Exterior Azek Trim #2

The winter winds are moving in and I’m not ready. But we will carry on, as I gotta get the siding up – hopefully this year. It would go quicker if I would quit making up fancy do-dads for the exterior trim.

For instance

1 fasciaI started by getting some fascia wrapped around the sunroom. When the roof was put on I used a spacer to make sure I could get the Azek trim under the gutter apron. That’s a nice, normal trim detail.

2 old house eave repairNow it gets more difficult. There are discussions all over the web about ‘pork chop’ or ‘mutton chop’ eave returns. That’s the blocked out ends of the eaves that almost every new home has, but most don’t like. This house had them originally – but then this was a low budget house when built.

3eave electricalSo my solution is to make a semi-recessed return.Ā  I’ve never seen it done, but why would that stop me? These are on the old part of the house. The roof overhang is 16″,Ā  which made these guys pretty big. I made them like cabinet panels using 3/4 trim stock for the frames and 1/2″ sheet stock for the insert.

4 eave boxI used super blue remodel boxes in a couple of locations. 110v power to the left and a cat5e cable to the right with an approved electrical divider in between. Just in case I want to add a Pan,Tilt & Zoom security camera later. Just planning ahead.

5 eave box finishedA weather proof cover keeps everything dry. The original fascia boards are in really good shape, being covered with aluminum for many decades. We’ll scrape them and use them as the backing for the new Azek 1X10 trim stock.

6 down lightsI used these fixtures for the down lights. They are available on Amazon – a pair costs less than 20.00. I used these because of the small junction boxes on top. They come with a 50w halogen bulb which I replaced with a 6.2w LED to reduce the heat. I used 10 of them and it lights up the whole perimeter of the house – using only 62 watts.

7 sunroom eavesThe sunroom side has eaves at about 11″, so they are a little smaller. Here you can see how I integrated the light box panel to the hidden vent soffit detail.

8 sunroom eave boxHere’s the back of that same box. You can see the recess back from the fascia – so this will take a little fancy cut work to trim out.

9 table sawThat’s why we drag out the 10″ table saw with a built in Triton router. We’ve got some fancy cuttin’ to do…

10 trim piecesDang, that’s the trim pieces that go around each of those light box/eave return things. Looks like the Azek dust will be flying – glad I’m doing this outside.

Stay tuned …

Exterior Azek Trim #1

So the stone is finally up and now the ball is fully back in my court – so we better get busy!

1 trim instalWe left off here. The puzzle piece detailed in the last post goes here. You see the little wood pieces on the left side of the eaves – that’s to hold the trim boards as I put them up by myself.

2 detail right sideI’ve recessed the ‘porkchop’ – that’s what they call that triangular thing that is used to terminate the eaves as it intersects a gable. This house had a big boxed one even with the fascia, so recessing this panel back behind the wall face makes it much less noticeable. Also note that I used a cabinet style panel when the flat area in the eaves seemed too large.

3 detail left sideI also made a gable decoration that’s made of flat stock Azek. I wanted a little detail up there. The under eave material is Azek bead board run parallel to the fascia and frieze board trim.

7 gable decorationThe Azek trim is pvc, so it’s perfect up against stone. I prepainted it with two coats of BM White Heron soft gloss before I put up the trim. It’s attached with cortex screws and stainless steel 16ga finish nails.

4 right side eaveThe eave will get a soffit panel for a switched electric circuit and LED down-lighting.
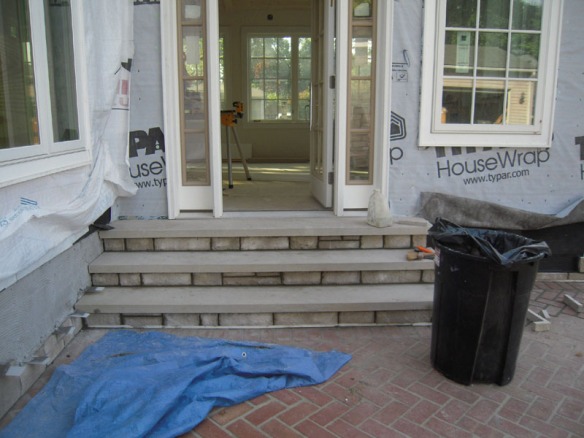
5 panel apartThe panels are made just like cabinet doors out of Azek. The frame is made from 3/4 stock and the insert is 1/2 sheet stock. Pocket screws and pvc glue are used to keep it together.

6 panel togetherPut some pvc glue and 7/8″ nails in the panel and it’s ready to install. Cut the holes where needed in the panel first.

8 eave electricalI used these IN Box by Arlington electrical boxes to run under eave electric. Oh, you can use 14ga wire for the lights, but I ran 12ga almost everywhere.

10 eave finishedThe open sections will get hidden vent aluminum soffits. I’ll put 10 LED down lights around the house.

11 trim completeSo the old girl is starting to go back together. More stuff added next time – at least we’re going in the right direction.


Veneer Stone #5 Finishing Up

Winter is closing in pretty quickly and I better get a move on some things if I want to have the siding up this year.

1 Wall WeepsThe stone belting goes from the front entrance to the stone mudroom – here are the rain screen weeps before their haircut.

2 Weeps GoneAnd after – they’re pretty much invisible, but will let any water out of the wall system.

3 patio repairThis part of the patio had to be repaired because water got under the slab and froze and dislodged the bricks – if you see that white strip to the left by the steps – that’s to space the stone to allow for some freeze movement to keep from damaging the masonry.

4 limestone patio stepsLimestone steps were used because they’ll age fairly quickly – and I want this place to look as though it was build years ago.

5 herringbone sidewalkI had the mason duplicate the herringbone pattern in the winding front sidewalk. Kinda Cottagy, don’t you think?

6 stone sawHe would do it on one condition – that I cut all the pieces to fit the complicated sidewalk. Here you see his 12″ brick saw that I became fast friends with over the course of this project.

7 azek spacerI had to use spacers under a lot of the brick work. I found strips of Azek worked best. It didn’t swell with water like plywood does and it is easy to remove after the mortar sets. Just drive in a screw –

8 azek spacer removealAnd it pops out will little effort.

9 trim puzzleNow it’s time to make things complicated. Here’s the first of many little trim projects. Made from Azek, the whole exterior trim is made from this stuff.

10 trim togetherSo pop the puzzle together with some PVC glue and stainless nails and it looks like this.

11 trim startAnd that little time waster will go right where the red arrow is pointing. Why? Because I gotta make it complicated. It’s a hobby, remember?

Fascias, Friezes and soffits are in my future – I just know it.


Veneer Stone #4 The Details

We’re moving along on the renovation at MisAdventures – a slow pace but a consistent one. Since I started this project in 2009 we are just getting the exterior prepared for the siding I hope to get up before winter.

1 rainscreen cornerThe rainscreen wraps around the corner with weeps installed above the final grade level. The white spacer below the stone on the porch is to allow for movement during the freeze/thaw cycles of winter – it will be removed later.

2 stainless casing beadThis is a detail of the stainless steel casing bead next to the window. This terminates the metal lath and scratch coat next to a window or door. The installed foam backer rod is caulked – this keeps the junction between the veneer stone and window or door water tight.

3 window weepsWeeps are added above the copper window flashing to allow moisture out of the rainscreen.

4 stone inspirationI used this house in the neighborhood which was built about the same time as mine as a pattern for the door detail.

5 stone headerSo I cut the veneer stone door header detail using that picture.

6 scratch coat frontAll the scratch coat is on and ready for the stone.

7 mudroom scratch coatThe mudroom and belting scratch coated as well.

8 mudroom headerFreshly laid stone with door header detail. Limestone window sills will be added later.

9 mudroom cornerThe weeps at the bottom are again spaced from the ground for the possible movement of the surrounding slab in the winter.

10 front in progressThe stone is wrapped around the limestone steps.

11 final pieceI hired a mason to work on the weekends by the hour. I installed the rainscreens and flashings and cut all the stone- he put the stuff on the wall and it worked out great. Here the last piece of stone is going on the front.

DSCN7905So the big pile of stone is slowly getting smaller.

Hang in there – we’ll get ‘er done eventually.

Veneer Stone #3 Getting it on the Wall

I’m trying like the dickens to get to the good stuff – it’s just that I want to make sure I show the process – just in case one of you out there in cyber-land wants to try your hand at this stone masonry thing.

First, when I was in the hospital and wheel chair for the last half of last year my trusty concrete contractor Shawn Thomas Masonry – turned out to be not so trusty. Remind me to put a red circle over his picture at my post here. It turns out he’s OK with concrete and he’s a heck of a block layer – but the rest is pretty poor. So after I got back on my feet I gave him the boot.

1 mudroom repairLot’s of problems to fix. Like cut electrical wires, buried rain screens and terrible flashing before the black stuff (rain screen went on) So, of course yours truly had to take it all off, tear into the wall to fix the electrical and flashing and drainage issues. Thanks ST.

2 waterproofing wall by patioThe lower perimeter of the mud room is waterproofed with an asphalt membrane. The lower sections of plywood sheathing on the patio side was replaced with treated plywood for extra protection.

3 waterproofing by doorIt was brought all the way around the mudroom base.

4 flashing cornersAt all intersections of the stone wall and siding an aluminum flashing was placed in the corners as extra protection. House wrap was added over this. You see the front of the house with the black rain screen material to your left.

5 Bad drip capSpeaking of really bad flashing.Ā  I think Shawn Thomas Masonry came up a little short on this one. The purpose of a head or capĀ  flashing is to cover the gap at the top of the window or door to keep water from flowing behind the casing. Take some notes ST.

6 copper drip capProbably just as well, so I could replace them with a soldered solid copper flashing.

7 drip cap closeupAnd you need to use copper nails to fasten the flashing to the wall. Protecto wrap will go over this and the house wrap will go over that.

8 mudroom with wireThe wire lath is attached with a roofing gun. Yep. everything is now flashed correctly. You’ll see a casing bead along the sides of the window – we’ll see more of that in the next post.

9 first stone foundationOn the concrete sections of the foundation a couple of courses of stone can go up. Part of this will be covered by dirt when the yard is properly graded. This is put on to keep the weeps up above ground level – you’ll see.

10 rainscreen startHere the rain screen is cut to match the stone contours. The material looks like corrugated cardboard split in two. It’s made of polypropylene and the fabric is used to keep the mortar out of the channels.

11 rainscreen weepsI found it much easier to put the weeps in this way. I used a little house wrap tape to hold them in position.

12 through the wall flashingThe wall is prepared with a flexible through the wall flashing that seals the top of the stone. This creates a barrier so water doesn’t get behind the stone and freeze causing bond failure. In this picture you can see the waterproofing, rain screen and weeps and the wire lath attached in the background.

13 weeps installedThe weeps are covered with the fabric to keep mortar from clogging the channels. Roofing nails fasten the expanded metal lath to the wood framingĀ  and blue tapcon screws are used to fasten the lath to the concrete below.

14 rainscreen with wireHere we are ready for the scratch coat. The layers from the inside out are as follows. House wrap – 15 pound asphalt felt – rain screen with fabric cover – expanded diamond lath.

Long post, but we’re getting somewhere.


Veneer Stone #2 The Technical Stuff

As my previous post eluded to – the concept of proper veneer stone installation seems more difficult in the explanation than application. I wanted to install the veneer the best possible way to ensure a long life. Unfortunately – there are multiple ways to put this stuff on a wall and everyone with experience installing veneer stone did it a different way.

This is a pretty tedious post – but I wanted to do this because I have seen so many veneer stone installations that are going to fail in a short time. This post has all the basics – the next post will show how I used the products to install my veneer stone.

So…after months of research and looking at many stone installations I came to the decision to do it this way.

Rainscreen-DetailsPretty simple, right?Ā  Yeah, sure – if your the Einstein of stone masons. My eyes glazed over when looking through all the stuff on the internet. But it really is pretty simple and makes a lot of sense when you start putting it on the wall.

The above is a typical home construction with wood framing over a concrete foundation.

Let’s break it down from the bare wall sheathing to the final stone – and why they’re (to me) important.

WRB – Or weather resistive barrier – most modern homes are constructed with a layer of ‘House Wrap’ Tyvek – Typar or other materials to protect the raw wood sheathing from the weather.Ā  On older houses they may have used a ‘felt paper’ impregnated with asphalt – or nothing at all. This goes on 1st as the last line of protection from water getting in.

Rainscreen – This is next. A layer of material that allows moisture to drain from the wall. If you have a traditional brick home you have a rainscreen behind the brick – a gap between the wood framed house and brick wall. In a veneer stone application you need to use something that spaces the stone away from the wood. I used MTI Sure Cavity because it has a rigid corrugated channel that installs very flat on the wall. This to me is a very important part – all stone, brick and concrete absorb moisture – no amount of sealing, painting or other mumbo jumbo will keep the water out. And when you do get moisture in the wall – you have to get it out. If not – there will be a problem sooner or later.

Weeps – These are the little devices that channel the water from the rainscreen through the stone to the outside. Repeat after meĀ  “You gotta have weeps”.

Flashing – Get you mind out of the gutter because if you did all of the fancy things above correctly and you mess this up – you just wasted time and money for nothing. Proper flashing of windows, doors, sills and other penetrations are top of the list of must do correctly.

Wire Lath – This is the mechanical fastening part of the veneer installation. When bricks are installed, brick ties are used to keep the bricks attached to the wall. With veneer, it’s wire lath. This is nailed securely to the sheathing and wall studs.

Scratch Coat – The first layer of mortar that is applied over the wire lath. It embeds the lath with mortar. Before the mortar hardens is textured with ridges to help key it in with the final mortar bed. That’s why it’s called a scratch coat.

Mortar Bed & Veneer – The final bed of mortar is just like tile – the stone is buttered and pressed in place. I used the same mortar for ‘grout’ to fill around the individual stone joints.

Grout – Serves the same function as tile grout – filling in the spaces around the veneer stone. You would use this if you wanted a special color for the grout.

Other Stuff – Things like Casing beads – backer rods and other accessories meant to make you more confused than ever. But they all have a purpose.


So we have the basics out of the way – next time lots of pictures using the above mentioned elements.


Veneer Stone #1 Go for it

This is the start of a new chapter in the Adventures series. I have puzzled over how to present this on the blog because the concepts are pretty simple, but the explanation is not so easy. As with all my projects there is a ton of research. but I get confused with just seeing it on paper – the best way to figure it out is just do it.

Step one – get the materials. Ā 

I’m pretty lucky in the fact that we live in southern Indiana – the state with a lot of limestone quarries. Many of the buildings in Washington DC, as well as other big cities use limestone from our state. Now most veneer clad houses around here use the pre-cast concrete stone made to look like the real thing – would that work for yours truly?

Nope.

1 U Haul TruckI found that I could get real limestone cheaper than the fake stuff – all I had to do is go get it to save shipping costs. So we went and rented the biggest truck we could find. Tiny Francia is behind the wheel.

2 Indian Creek StoneAnd off we went to Indian Creek Stone Products in Mitchel Indiana – about an hour and a half drive away. SimpleĀ  – well, not really.

3 Francia and Dave FranklinHere’s Francia and the Stone manager, Dave Franklin – he was a great guy to work with. And here’s why.

4 loading truckBecause I needed the biggest truck they had – it didn’t have a flat bottom in the cargo bed. The wheel wells stuck up about 6″. Here I’m deciding which pallet to unload and move to get past the wheel wells. If I had known what I was in for I would have built a wooden deck 6″ tall to make the bed flat. OK, next time.

5 stone loadingSo after an hour of moving each piece on two pallets ( Thanks Dave for the help) we were able to load the rest.

6 truck tireOnce all the veneer and cut stone was loaded, the truck wasn’t too happy. The suspension was resting on the rubber limiters that keep the tires from rubbing against the body. Sorry Mr. U-Haul.

7 stone in yardSo the trip coming back took twice as long – mainly because there’s a lot of hills and the big old truck topped out at 35 miles an hour going up hill. But it was a lot faster going down hill – yikes! But we made it and here sits several tons of limestone.

Now all we have to do is figure out how to get this stuff on the wall….

Master Bath Reno #8

Well, it’s been a little while since my last post – lots happening, but short on time to report back to you, my bemused friends. As with every project in the house – I’ll be saying so long to the bathroom for a spell. There’s lots of other things to finish on the outside before winter – like side the house.

But for now, we’ll concentrate on this freestyle master bath design.

1 cabinet mountHere we start fastening the cabinets to the building – Since there is space between the cabinet back and the wall, we’ll use a ‘U’ shaped cleat to tie the two together.

2 vanity wall startThis will also serve as the base for the wall between the cabinets. I think I’ll put a vanity table there.

3 vanity wall finishThe wall is built with a space for a deep medicine cabinet – that will be the home of my wife’s girly lotions, makeup and stuff. If you notice, the cabinet shelf on the left is slightly lower than the one on the right. That’s because I’m taller and that’s supposed to be my cabinet – but whether I get a closet is highly suspect. 4 vanity mock upAs with everything in this project – we have to make some kind of mock-up to see if the design will work.

5 vanity cabinetI popped in one of the medicine cabinets I’m using above the sinks – the real one is called the Alfina Broadway single door 7″ deep cabinet. This one is a standard depth cabinet by the same maker..


6 old doorThen I had these old doors laying around from the Gallery renovation – so I cut them in two and will have to figure a way to make it look right.

7 double doorsI’m not certain how I’ll make these work, but my wife wants me to use them – so I guess we’ll all find out if, how, what and where this little adventure goes – sometime later this year.


Hang in there – we’re going the learn how to put limestone on an old house next.