
Greetings fellow renovators and handy people! Warning! Long post.
As I mentioned in my last post, we’ll be building a bathroom vanity from scrap wood for the Woman Cave bathroom. Now scrap wood might be a misleading title, as I have a lot of nice scrap wood lying around due to an 8 year whole house remodel.
 First things first. A little inspiration. I checked out all kinds of vanities online and picked a few images I thought had some of the features I wanted. Then grab a scrap piece of paper and start doodling and ciphering. Next we make the outer frame.
 And here’s what we get. I made a pair of inset doors with a rail and stile router set and plan on having 4 drawers on the side. The face frame is assembled with Kreg screws.
 Now we prance down to the basement and see what it will look like. You can see my invisible wife reviewing the vanity. (Not really – it’s just her slippers) The design has one sink -offset with ample space to the right of the sink for girly stuff.
 With the design finalized it’s time to dig out some 3/4″ UV coated plywood. It’s really a lot heavier than needed, but it’s what I had on hand. This will form the sides and bottom of the compartment accessed by the doors under the sink.
 This ‘U’ was installed with a side panel made from 1/2″ plywood.
 The doors were assembled and installed with self closing inset hinges. I’m not certain why I make everything with inset doors – overlay doors are much easier to make. Maybe that’s why…
 The drawer face frames were made from scrap poplar and fastened with glue and a single Kreg screw. The back will be routed to insert 1/2″ plywood.
 Each inset drawer face was made slightly larger than the cabinet to allow trimming to fit. The sides of the vanity that are against the wall have plywood mounting strips to screw in the wall studs.
 I used 1/2″ poplar for the drawer sides and used a dado blade on the table saw to make all the cuts. The corners of the box used a dado and tenon joint which is stronger than a traditional dovetail joint – although not near as pretty. I used 1/2″ plywood drawer bottoms – way more than needed, but that’s all I had laying around.
 I used Blum Tandem under-mount drawer slides which requires a notch and hole to be placed at the back of the drawer box. I ran the boxes through the table saw and broke out the notch, then cleaned up the cut with a razor knife.
 These are the locking mechanisms on the bottom of the drawer. The slides fit on the drawer (see notches at back) and simply push in to lock the drawer in place. To remove the drawer, you squeeze them to unlock and remove the drawer.
 Since I’m using inset drawers I opted for the adjustable locks which allow you to move the drawer box inside the frame to get the right reveal around the face frame. You can see the dado and tenon box joint here.
 For finishing, I used 4 coats of water-based polyurethane clear on the drawer boxes. The vanity was painted with BM Sterling and then coated with 4 coats of the same water-base polyurethane. The finish was then wet sanded with 400 grit sandpaper and polished with an 800 grit buffing pad. It’s smooth.
 I’ve got the vanity in place and making a template for the quartz top. The sink is centered over the doors and allows counter space to the right. I used square chrome knobs for easy opening.
 Of course, there’s always a problem. I placed this sconce too far to the left. Oops.
 So we’ll remove the box on the left and get an old work box for the proper location. The only problem is that there is spray foam that buried the wires. Not as easy as I thought it would be.
 So we’ll make a bigger hole. Dig the sconce wire out and patch it all up. Move along – nothing to see here.
 While I was wrestling with the sconces, the counter guys made a quick job with the top and got the Porcher Marquee sink in place. I bought the sink a couple of years ago and it’s no longer being manufactured. The faucet is a Moen Eva in chrome.
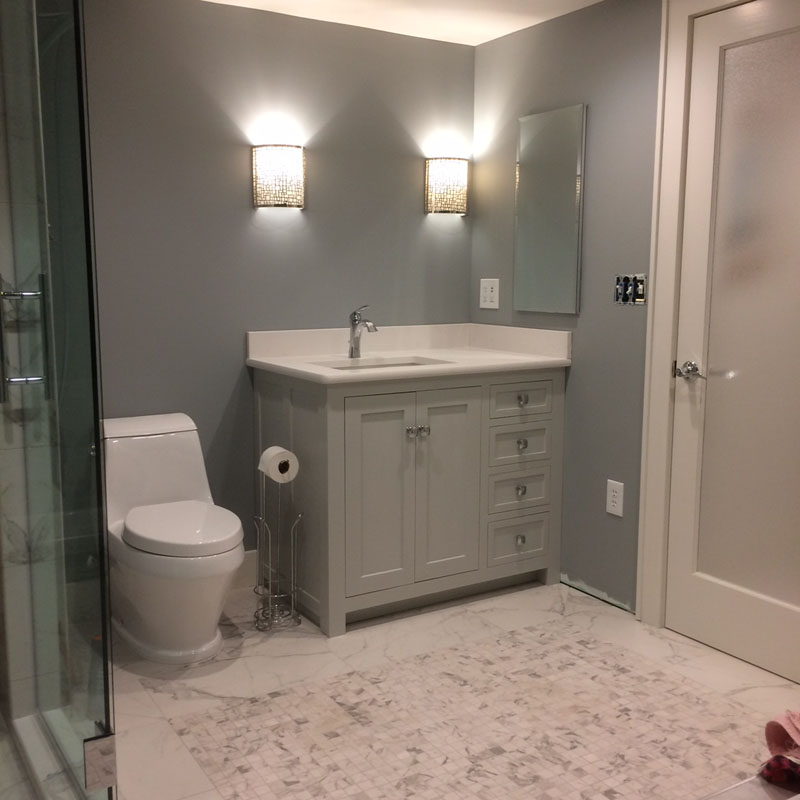 I plumbed it up over the weekend and all is fine. I have a few more items to add in here (like a tilt mirror) and we’ll call this one done. The medicine cabinet on the right wall might look a little strange. I put it there because I couldn’t recess one behind the sink due to the spray foam.
Sorry for the long post -if you’re still with me. I just wanted to get this one out of the way.
Stick around – it might get interesting.

Lovely Curt. You are a real artist you know
Hi Gill ! Thanks I’ve been called a lot of things, but never an artist 🙂 So thanks so much!
Beautiful work, as always, Curt. I’m sure the slippers approved.
Ha, ha – thanks Dan! At least the slippers are on board with this renovation.
you make it so easy! Any particular reason why the mirror is on the side instead of the front?
Hi! your right in your post below. It couldn’t be recessed in the wall, and my wife wanted one that was recessed – so that was the only place it could go.
…. because it is a recess medicine cabinet! hum….. what does your wife think? it is going to her Cave after all.
Exactly! There will be a tilting mirror between the sconces. She liked the recessed cabinet on on the side. When you open the cabinet there is another mirror on the inside of the door. She says she likes being able the adjust the angle.
Fantastic job as always! I like the extra mirror provided by the recessed medicine cabinet.
Thanks Kristin, or is it Melanie? I think it will look ok when I get the other mirror in.
Ladies need to adjust their angle
That must be true – the mysteries of the opposite sex. Trevor and I can commiserate.
AWESOME! I love recycling materials to make something new!
Thanks Laura! I sure have a lot scrap – I’m thinking of making another vanity for the master bath. We’ll see.
I am so far behind on posting updates on my current project…I’ve recycled many things from this old house.
You go girl! Time for a break and post some of those projects!
Hi curt, beautiful craftsmanship! Could you explain the difference between inset and overlay?
Hi Lauren! Thanks! An inset door or drawer has the front of the cabinet flush, with the door / drawer ‘inset’ in the face frame. An overlay door sits on top of the face frame.The inset style takes a little more care to get the reveal around the face frame equal. The overlay style lets you have a little more margin for error, since there’s no critical margin around the face frame that shows.
Thanks for the explanation. I can visualize the difference now. 😊
Lovely cabinet. I have to admit I’ve still never achieved painting results like you do. I know it’s because I don’t sand between coats. I guess I’m like most people who think of painting as applying the paint, letting it dry and hoping for good even coverage. My greatest ability with paint seems to be that I don’t make much of a mess and I can edge paint straight lines. Wish I got excellect results like you do instead – even if it meant getting a bit dirty. 😉
Hi Kate! Yep, it takes a little sanding 🙂 One thing you can try is Floetrol. It’s an additive to latex paint and it will give you a near sprayed on finish if you follow directions. Here’s a Link. http://www.homedepot.com/p/Flood-Floetrol-1-qt-Clear-Latex-Paint-Additive-FLD6-04/100198078
WHAT!!! That is insane – Absolutely Amazing! Curt’s next post: “I had some scrap construction paper, used match sticks, and sawdust and built this armoire.” Show off…. Seriously good job!
Ha, ha Alex – funny! Now I appreciate the compliments, but I’m no cabinet maker. I mean, this thing is put together with Kreg screws. Check out this blog: https://brianholcombewoodworker.com/
If you want to see a true craftsman. When I look at so many amazing craftspeople I never put myself in that category. Keep making sawdust, my friend.
What a perfect little vanity! The care you take with painting puts me (and most folks, I bet) to shame. I wish I had more patience … but patience is not my strong suit. Eric admires your work, too. He’s had lots of experience making inset doors for our kitchen.
Hi D’Arcy! That’s the OCD kicking in…sand, sand, sand. Eric has one on me – I have the kitchen cabinets being built – if not, I’d have a 10 year renovation on my hands. 🙂
Smart move. Our kitchen only took three years and we still have a pick list of things to fix. Not everything came out perfectly.
Wow…I am impressed and I love the way the whole bath looks i.e. flooring, paint color, drawer hardware. Wished you lived closer, I would put you to work!!!
Thanks so much! It is a work in progress, so I still have time to mess it up. We’ll see.
Geat job. As much as I like the look of inset, I just would not give up the space. Full overlay every time, and preferably frameless, for me.
Pingback: February is Finished | Adventures in Remodeling