Now that we have the woman cave kinda finished, let’s move on to the 1st floor. Time to tackle the living room fireplace.
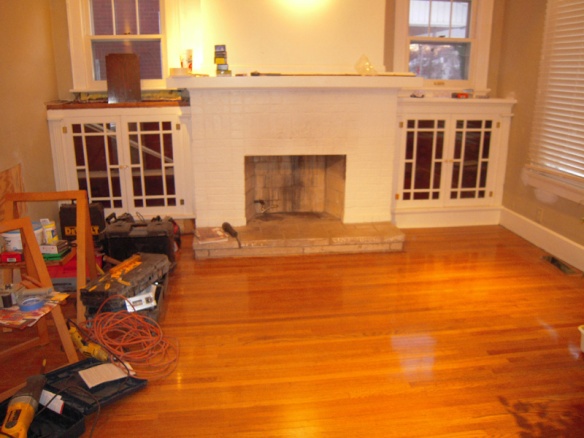
It looked like this when we bought the place in 2009.
 It looked so cute, but looks can be deceiving. The rug on the hearth hid the fact the whole fireplace was crooked. It had a gas insert that was not to code, painted brick that was poorly built. The old double hung windows were drafty and no insulation made this part of the room cold. We’ll fix it.
 As always first we tear it apart.Which also included resurfacing the ceiling and two walls because of plaster damage.
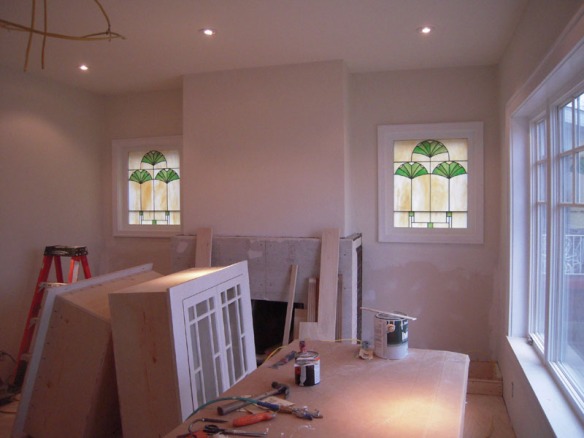 I removed the windows and added energy star units that didn’t open – added stained glass windows to hide the neighbor’s house and used the original cabinet doors and made new boxes to go on either side of the fireplace.New insulation and drywall was placed to repair all of the damaged and lost plaster.
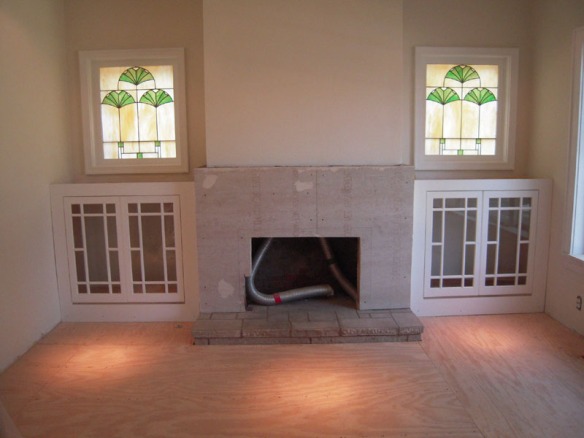 I used thinset to attach hardibacker with tapcon screws over the uneven brick surface and ran two air lines for the direct vent fireplace and put a new cap on the chimney, ran a new electrical line to the right side of the fire box and had new gas lines with a code approved floor shut off added.
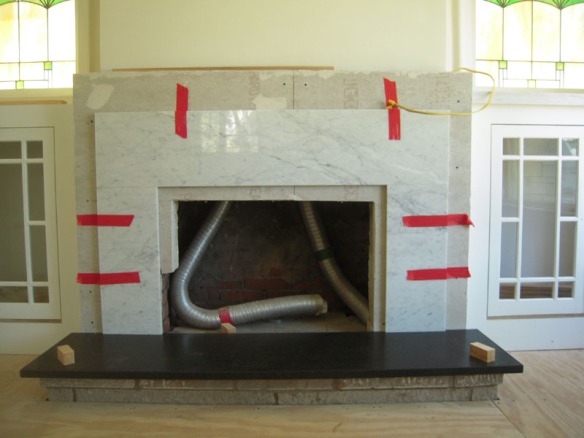 Again I dragged my wife to Nashville to look at some stone and came home with this carrera marble slab. They cut the three pieces so the grain and pattern of the stone matched.
The hearth is a piece of leathered finish black granite. The original hearth was limestone, but in really poor shape and was 1 1/2″ out out square.
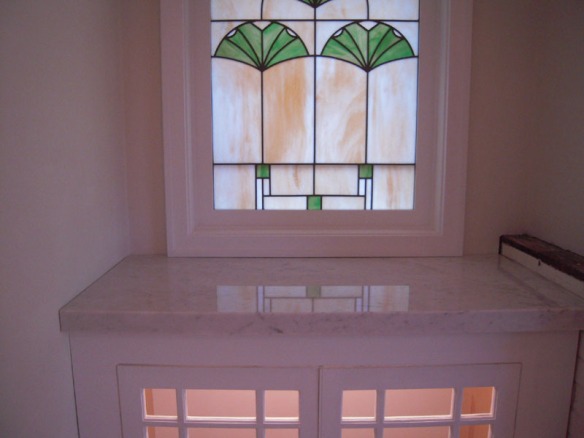 The tops of the bookcases were capped with part of the same slab.
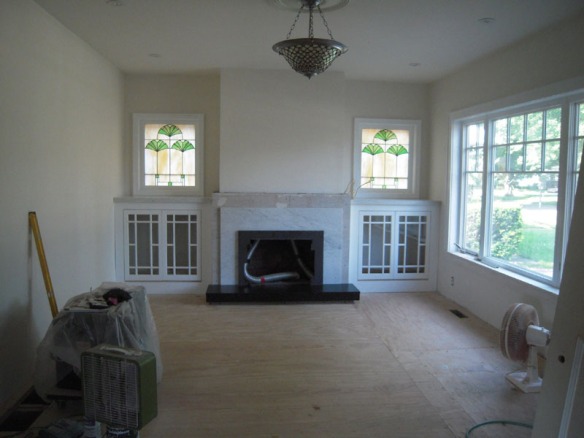 The hearth got a skirting of the same granite. It will match the black fireplace surround. The floor dipped on the right hand side about 3/4″ so that was fixed when I added the 1/2″ CDX plywood overlay. Now the new hardwood will be flat and level.
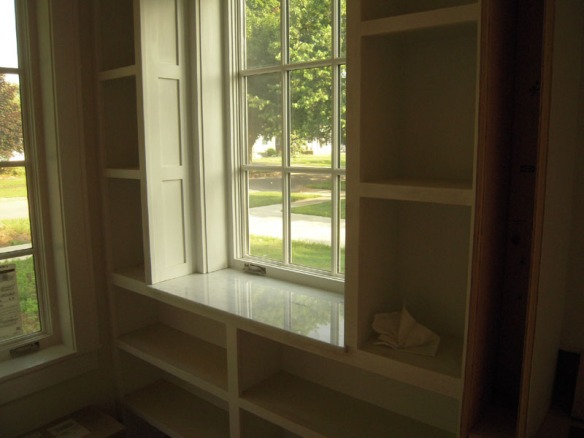 Additional pieces of marble were placed in the sunroom bookcase windows.
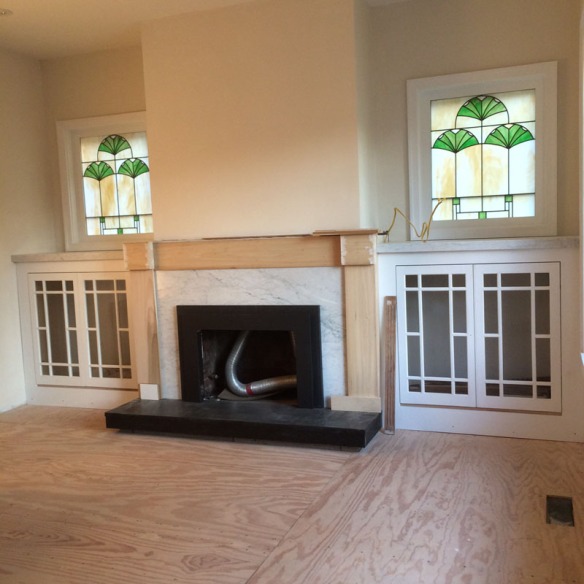 This picture represents a week of doodling and trying to figure out what to do with this thing. After a lot of head scratching I got this – not much to look at. The reason for all the doodling? Nothing on this brick fireplace was square, level or plumb. Instead of building this surround as a one piece unit, the pilasters and crosspiece are not permanently attached to each other so that I can make adjustments to make square. Nothing is glued or installed yet. All I know that this is the general scale and shape of what’s going here.
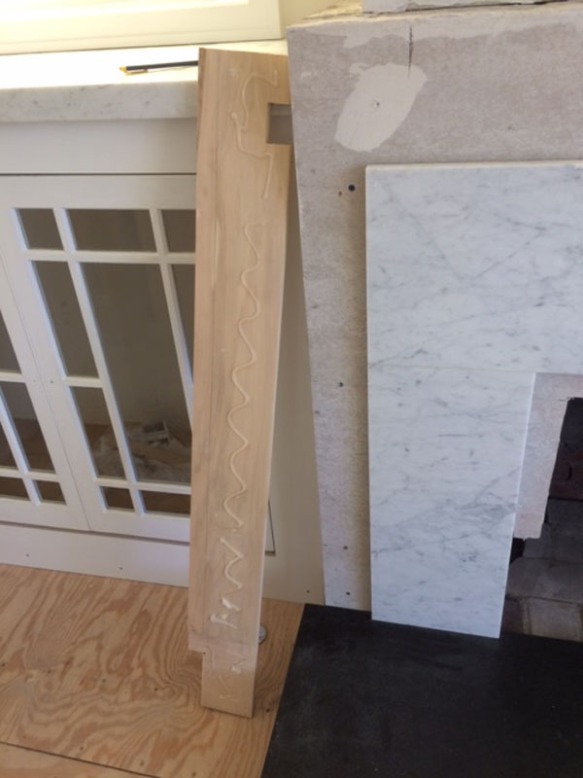 But I have to start making this a permanent thing, so just to be safe I started with the side pieces that will intersect with the cabinet frames. You can see the cuts to fit over the marble tops and granite hearth. I used silicone here for a couple of reasons – mainly because if I’ve made a mistake I can get this thing back off the fireplace. If I would have used polyurethane glue – I would have to destroy my fancy cut-work
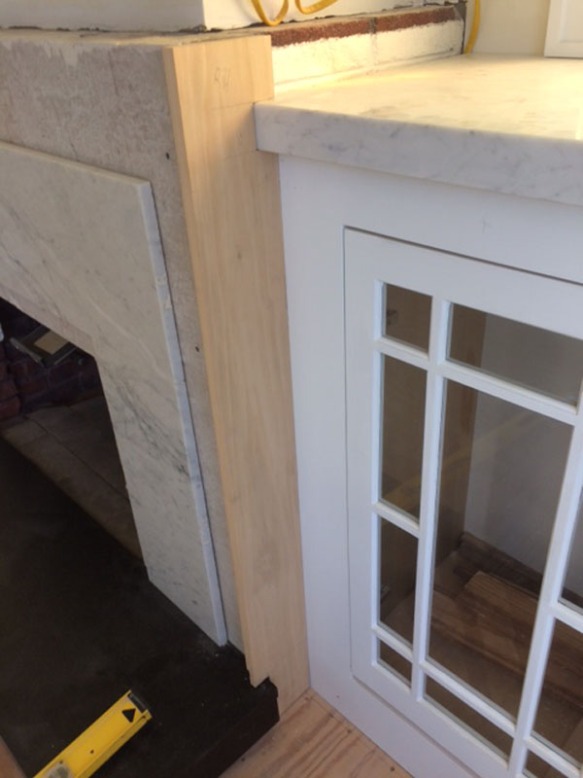 The sides installed we can start building our floating fireplace parts on this foundation. Since I don’t know what the final design is, I’ll put on elements that I know will have to be in place before the next piece of this puzzle goes on.
The front piece of the pilaster is dadoed on the back to fit in the side piece. It is not glued or attached and this allows for it to ‘float’. This will be how we adjust for the out of square parts of the fireplace structure.
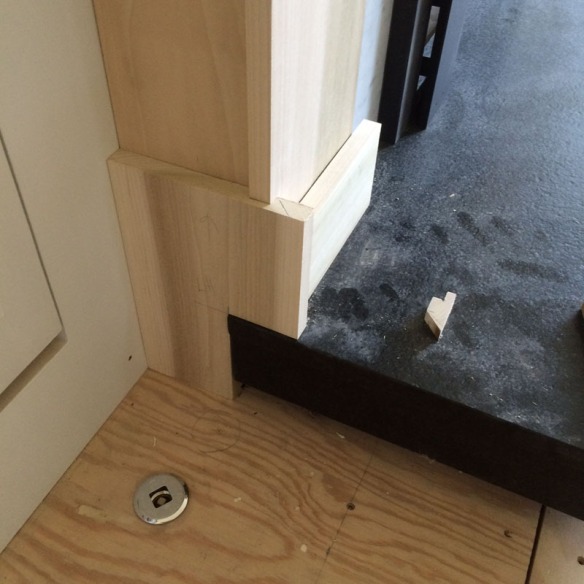
I know we’ll need base caps, so let’s make those.First we make the side base. This is notched over the hearth and is dadoed into the face of the fireplace pilaster. The front piece sits proud of the side piece because they’ll be an additional detail there.The side cap is cut to rough shape and temporarily put in place.
A sample block of the front of the cap is used to mark the side piece for cutting.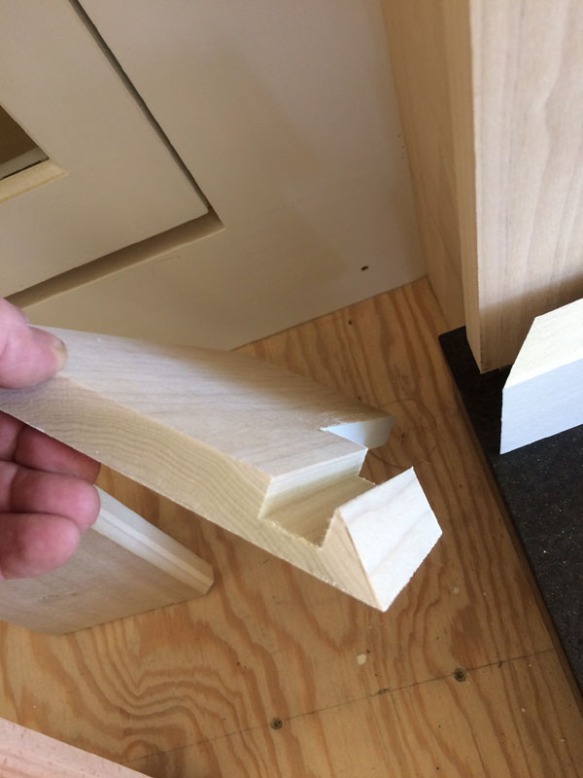
Once the side piece is cut it looks like this.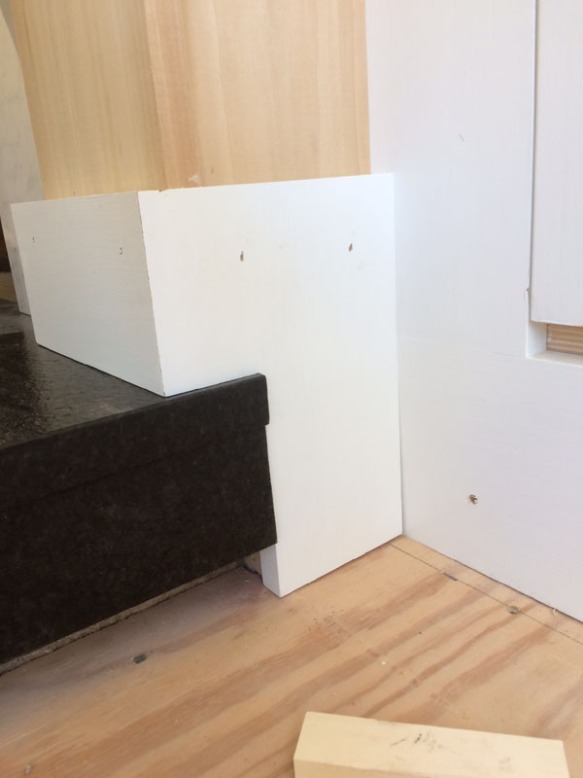 Before final installation I paint the pieces that are next to the granite, so final painting will be easy to do.
Bored yet? More to come.


Bored?! Blown away more like it. Nice job! You have mad skills!
You’re always so kind Alex – it’s just I take a lot of time – and you never see my rejects. 🙂
Looking fabulous!
Thanks so much Laura! One day I’ll have a roaring fire – hopefully it will be in the fireplace.
Bored?! never… I am so enjoying this, looking with wondering eyes at the way you puzzle this thing into being… 😉 Really wish I had some of your talent to give my own cabin a work-over… 🙂
Thanks Nil – a product of too much time on my hands. I really don’t think it’s much about talent as it is passion and interest. Look at your fabulous photographs.- I was a professional photographer and grew up in the business. I have great technical skills in darkroom processes before digital – trained in the old transparent oil tinting before color photography was common. But you have a greater passion and vision – a sense of composition and timing. That is talent. I just make sawdust.
Ooops! Sorry about the first ‘broken’ reply… seems I mistyped something that WP interpreted as ‘send’…
Passion and interest (and of course time) are certainly part of it – but also patience to see it through… and in modelling, as you call it, I am just very practical. A table wiggles – I find a way to stop it doing that. If someone who works with your precision would see how I did it, he would probably instantly get grey hair 😉
And thanks for your lovely compliment! 🙂
exquisite as usual.
Thanks old friend – it’s nice to see your comments.
Wonderful work here. I especially like how you added the marble to the window ledges in your sunroom 😀
I really liked that touch, too!
Thanks Marti!
Thanks Cheryl – I had some pieces left over, so they had to go somewhere. 🙂
A level floor? But … when you drop a golf ball it won’t roll under the furniture. What fun is that?
I enjoy watching these puzzle pieces go together, too. Not boring!
Hi D’Arcy! Ha ha…yes level. I smiled because I’m so weird like that. I don’t think I posted about the 500 pound 20′ long steel I beam that I ran through the middle of the house to take a dip out of the floor between the living room and kitchen. Why am I so OCD?
Because you couldn’t do what you do if you weren’t!
Well, you just saved me a trip to my therapist – I owe you…
Looks good
Thanks Aaron! I appreciate your comment.
Not bored at all! Really love all these details. And your stained glass windows are lovely.
Thanks Marti – I had those windows made by a friend of mine to hide the neighbor’s brick wall. The design is a Ginkgo leaf design and I’m trying to tie the fireplace details in with this motif. We’ll see how it goes.
Beautiful, can’t wait to see the end result!
Thanks so much Jessica! Oh, I hope one day to get my Shaker cabinets in the kitchen – but then there’s no kitchen yet. They look beautiful!
Nothing is ever square in an old house. That’s my motto. Loving your detailing!
Hi Jess! I didn’t know about your renovation blog https://brisvegashome.wordpress.com/ but I’m following now! Yes – out of square for sure. The old saying ‘they don’t build them like they used to’ – I for one, am glad they don’t – parts of this place were crazy poorly built. But we’ll square it up.
Brilliant Curt, although most of my renovation blog consists of me dreaming about what I’d LIKE to do to Harry’s Money Pit, and rather less about the ACTUAL renos! Loving your wonderful, intricate explanations about the building process. I’m thinking of taking up an introduction to carpentry next year because I’m sick of feeling so helpless in the face of building a pest-free chookpen,
Great details! Looks wonderful.
Thanks so much Kate!
Love all of the details you added, especially all of the beautiful marble! So glad you saved and reused the cabinets beside the fireplace too!
Thanks Susan! The cabinet doors are the only thing left – I made the cabinet boxes much deeper to hold artsy stuff, but hopefully it will look original. Time will tell.
The updates are incredible — love love love the stained glass windows and the choice of marble for the fireplace and other ‘caps.’ Wow!! This house was really lucky when they passed out ‘caretakers.’ all the best, Danielle
Hi Danielle! Sometimes I think this place wants to say ‘leave me alone’. But thank you – I really hope this home finds a family that will create many happy memories here after I pass it on.
Nice job! It looks amazing already, Eager to see the final reveal!
Thank you so much – not sure if it’s Kristin or Melanie, but I want to say I love your blog https://fallbreeze.net/ and am now a follower. Since I design freestyle – I’m not sure what the final look will be – so we’ll both be surprised at the final reveal.
Golly Curt! I wish we could’ve have flown you over here to advise us on our cabinet work. I so appreciate your attention to detail. It’s looking amazing. You mention Nashville? Do you live in Tennessee? For some reason I have always pictured you out in the mid-west somewhere. I spent a year as an exchange student in Alabama many, many years ago and visited Tennessee. I grew to love American homes during that year and am still strongly influenced by them.
Hi Jacqui! You know, I told my wife when I get this house done I would like to do some working vacations. We could visit some of my blog friends and I could help them with their renovations for a week or two and then blog about how the projects go…we’ll see if she’s up for it. We live about 2 hours from Louisville, 2 1/2 hours from Nashville, 3 hours from St. Louis and 5 hours from Chicago – all places I’ve dragged my wife to look at something for the house. We live in Evansville, Indiana – the very bottom of the tip of the state. Our city of 180,000 is on the Ohio river and sits on the border lines of Illinois and Kentucky. I spent a lot of time in Montgomery, Alabama and my niece did her post graduate work in Birmingham. That’s a typical beautiful southern city.
I have only just seen this reply, Curt. Thank you. Indiana! I have never ‘met’ anyone from there before. Most I know about it is the song ‘Indiana wants me…’ You and your wife most welcome to visit us if you ever get round to that working vacation. I’ll try not to keep you too busy!
Hi Jacqui – well one of these days I might take you up on that offer – if I ever get this place finished.
I love the stained glass!
Thank Laura –
I had them made in 2010 and didn’t install them until 2015 – now that a slow process. But I promise to finish this place one day.
Learning to make stained glass windows is on my bucket list.